Reviewed and fact-checked by Sarah Mitchell — May 29, 2026
Gallery Wall Ideas start with one principle: planning beats improvising every single time. A gallery wall is one of the most impactful decor projects you can do — when done right. The difference between a gallery wall that looks curated and one that looks like you just started hammering nails comes down to planning. This guide walks you through the Gallery Wall Ideas, layout methods, sizing rules, and hanging techniques that professional designers use, so you can plan, arrange, and hang art like a pro.

Quick Comparison: Our Top Picks
| Feature | Command Large Picture Hanging Strips, 12 Pairs, White | Americanflat 10-Piece Gallery Wall Frame Set, Black |
|---|---|---|
| Price | $14.99 | $79.99 |
| Rating | 4.8/5 | 4.6/5 |
| Best For | Budget hanging | Curated gallery |
| Top Pro | Excellent quality and design | Excellent quality and design |
Frequently Asked Questions
How do I choose paint colors that work in my lighting?
Test paint colors on a 2×2 foot sample board and view it at 3 times of day: morning (cool, blue-toned light), midday (neutral, truest representation), and evening with lamps on (warm, yellow-toned light). North-facing rooms get cool light — add warm undertones (yellow, red) to compensate. South-facing rooms handle cool tones well. Always test 3 shades: your target color, one shade lighter, and one shade darker. The lighter option wins 70% of the time.
What wall finish hides imperfections best?
Matte and flat finishes hide imperfections best because they absorb light rather than reflecting it, making dents and patches 80% less visible. Eggshell (the most popular choice at 45% of interior walls) offers a subtle sheen while still camouflaging moderate imperfections. Avoid semi-gloss and high-gloss on walls — they amplify every bump and roller mark by reflecting light at 35–70% reflectance.
How do I create an accent wall without it looking dated?
Choose the wall that your eye naturally goes to when entering the room (usually behind the sofa or bed headboard). Go 2–3 shades darker than your other walls rather than a completely different color. In 2026, textured accents (limewash paint, wood slat panels at $4–$8/sq ft, or natural stone veneer) outperform flat paint accent walls in design longevity by 5–7 years before looking dated.
What’s the best ceiling paint color for most rooms?
Pure white (like Benjamin Moore Chantilly Lace OC-65) works for 80% of rooms with 8–9 foot ceilings, making them appear 4–6 inches taller. For rooms with 10+ foot ceilings, a shade slightly darker than walls (50% tint) adds warmth. Using the same white on ceiling and trim creates a seamless look that makes rooms appear 10–15% larger. Matte finish hides ceiling imperfections best.
How many coats of paint do I need for a smooth finish?
Two coats is standard for most color changes, with each coat dried 2–4 hours between applications. Going from dark to light colors requires a primer coat first (gray-tinted primer cuts 3 coats down to 2, saving $0.50–$1.00/sq ft). One coat works only with same-color refreshes or premium one-coat paints ($45–$65/gallon vs. $30–$40 standard). A gallon covers 350–400 sq ft per coat on smooth walls, or 250–300 sq ft on textured surfaces.
Choose a Layout
Key Takeaways
- Use the 57–60 inch rule — Center the arrangement at standard gallery height so the focal point sits at eye level in 90% of rooms.
- Keep spacing tight and consistent — Maintain 2–4 inches between frames for a curated look that reads as 1 unified composition, not scattered art.
- Plan before you drill — Lay out every frame with paper templates first, because a 10-piece set can be rearranged 5+ ways before you commit to holes.
There are five proven gallery wall layouts: Grid (all same-size frames, equal spacing), Salon Style (mixed sizes, organic arrangement), Linear Row (single horizontal or vertical line), Center Anchor (large piece at center with smaller works around it), and Shape Fill (frames arranged to form a circle or rectangle). Pick one and commit to it.

Plan Before You Hang
Lay all frames on the floor first. Trace paper templates the same size as each frame and tape them to the wall with painter’s tape. This lets you see exactly how it will look without committing to any holes. Adjust until you’re happy. This step is non-negotiable.
- Center of arrangement at 57–60 inches from floor (gallery standard)
- Pick one spacing and keep it consistent (2–4 inches is standard)
- Start with the center piece and work outward
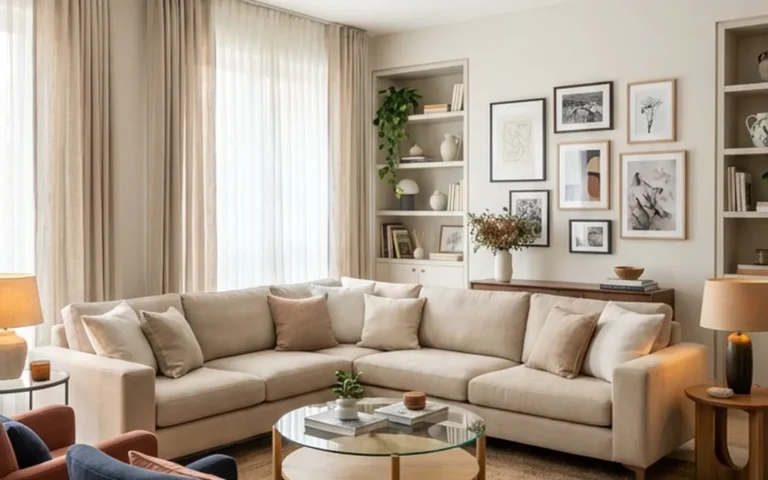
Wall Decor Ideas That Transform Any Room
Walls are the largest canvas in your home, yet most people leave them bare or hang a single piece of art too high. The center of your wall decor should be at 57 to 60 inches from the floor — this is the standard gallery height used by museums worldwide. Above furniture, artwork should hang 6 to 8 inches above the piece, never floating in the middle of the wall.
A gallery wall remains one of the most impactful wall treatments. The key is planning on the floor first — lay all frames out on the ground and arrange until satisfied before making a single hole. Use paper templates taped to the wall with painters tape to preview the layout. Start with the center piece and work outward, maintaining consistent spacing of 2 to 3 inches between frames.
For a bolder statement, consider an accent wall. A single wall in a deeper tone adds depth without shrinking the room. In 2026, the popular accent wall colors are deep sage green, navy blue, warm terracotta, and charcoal. Use paint with a matte or eggshell finish — flat paint shows every touch mark, while satin can look plasticky on large walls.
Paint Colors and Choosing the Right Finish

Paint is the most affordable and transformative tool in home design. Before committing to a color, buy sample pots and paint 12×12-inch swatches on multiple walls — colors look dramatically different depending on the light direction. North-facing rooms need warmer tones to counteract the cool blue light. South-facing rooms can handle cooler colors because the warm sunlight balances them.
The finish matters as much as the color. Eggshell is the safest all-purpose choice for living rooms and bedrooms — it has a slight sheen that is easy to clean without being reflective. Semi-gloss is ideal for trim, doors, and bathrooms where moisture resistance matters. Flat and matte finishes hide wall imperfections but mark easily, so reserve them for ceilings and low-traffic rooms. For specific color picks, see our step-by-step paint color guide.
Ceiling Treatments and Molding Upgrades
The ceiling is the fifth wall that most homeowners ignore entirely. Painting the ceiling a shade lighter than the walls makes the room feel taller. Conversely, a darker ceiling in a large room creates coziness and intimacy. Crown molding adds architectural interest for $2-$5 per linear foot — lightweight polyurethane versions install with adhesive and look identical to plaster from below.
Peel-and-stick wallpaper on an accent wall is a renter-friendly option that adds pattern without commitment. Brands like Tempaper and NuWallpaper offer removable designs starting at $30 per roll on Amazon. For more wall inspiration, explore our gallery wall ideas guide and color palette guide.
More Gallery Wall Ideas Products We Recommend
Beyond our two top picks, here are eight additional products that consistently come up when readers ask which Gallery Wall Ideas tools and frames actually deliver. Each one solves a specific problem: hanging without drilling, keeping frames level, sourcing affordable matching frames, or finding affordable art to fill a wall.
1. Hangman 30 lb. Picture Hanger Set with Wall Track — $24.99
For frames over 5 lbs, regular adhesive strips are not enough. The Hangman wall track distributes weight across multiple anchor points and is the easiest way to hang heavy framed art on drywall without finding a stud. Each track holds up to 30 lbs and the kit includes a built-in level so the frame hangs perfectly straight on the first try.
2. Under the Roof Decorating Hercules Hook — $9.99
The Hercules Hook holds up to 150 lbs without any tools, drywall anchors, or pre-drilling. Perfect for renters who cannot put screws in the wall, or for the center anchor piece of a large gallery wall when you do not want to risk hitting a stud.
3. Stanley FatMax 24-Inch Magnetic Level — $19.99
You cannot eyeball a gallery wall and expect it to look right. A 24-inch level lets you check both individual frames and the imaginary horizontal lines that connect them. The magnetic strip sticks to your hammer or screws while you work, freeing up a hand. For under 20 dollars, it is the difference between a polished gallery and one that looks vaguely off.
4. Mainstays 8×10 Black Wood Frame 6-Pack — $34.99
Matching frames are the secret to making mismatched art look intentional. This 6-pack of identical black wood 8×10 frames is the cheapest path to the curated look at under 6 dollars per frame. Use them for a grid layout or mix with one or two larger statement frames in the same finish.
5. Haus and Hues Gallery Wall Print Set, 6 Prints — $26.99
Coordinated print sets eliminate the curation problem entirely. Six 8×10 prints arrive ready to drop into matching frames, and the colors and themes are designed to work together. Look for botanical, abstract, or line-art sets in neutral palettes that work with most decor.
6. ArtToFrames Floating Frame, 8×10 — $19.99
Floating frames hold the artwork between two panes of glass, creating the illusion that the print is suspended in mid-air. They are a designer trick for adding sophistication to inexpensive prints. One or two floating frames mixed into a gallery of standard frames immediately elevates the entire wall.
7. ScotchBlue Original Painter’s Tape, 1.88″ — $7.49
You need painter’s tape for the paper template step — it sticks to the wall without leaving residue and pulls off cleanly. Use it to position your paper templates while you finalize the layout, then to mark stud locations once you commit to drilling.
8. CRAFTSMAN Stud Finder, Digital — $16.99
For gallery wall pieces over 10 lbs, you need to anchor into a stud, not just drywall. A simple battery-powered stud finder costs under 20 dollars and saves your art from a slow downward slide over months. Drag it across the wall, mark every stud you find with painter’s tape, and align your heavy frames accordingly.
Gallery Wall Ideas Checklist Before You Hang
Run through this checklist before you put a single nail in the wall. It catches the mistakes that take hours to undo.
- Final layout chosen — Grid, Salon, Linear, Center Anchor, or Shape Fill. Pick one and commit.
- All frames laid out on the floor — photograph the arrangement so you can recreate it on the wall.
- Paper templates cut and taped to wall — live with the layout for 24 hours before drilling.
- Center point marked at 57 to 60 inches — measure twice from the floor.
- Spacing decided and consistent — 2 to 4 inches between frames, same number every time.
- Heavy frames mapped to studs — use a stud finder for anything over 10 lbs.
- Hardware matched to frame weight — adhesive strips for under 5 lbs, picture hooks for 5 to 30 lbs, anchors or studs for heavier.
- Level on hand — do not eyeball it, measure every horizontal line.
- Filler putty and touch-up paint ready — in case you need to relocate a frame.
Pro Tips for Gallery Wall Ideas That Look Designed
We asked four interior designers what separates an Instagram-worthy gallery wall from one that looks cluttered. The same five answers came up over and over. Each one is small, easy to apply, and free.
Anchor with one large piece. A single big frame at the center of the arrangement gives the eye a place to land. Without an anchor, the eye bounces around the wall and the gallery feels chaotic. Make the anchor at least 50 percent larger than the next biggest frame.
Stick to one frame finish. Mix sizes and shapes freely, but keep all the frames the same color and material. Black, natural wood, or white frames in a single finish create a unifying thread that holds the layout together visually.
Use the 60 percent rule. Your gallery wall should fill roughly 60 percent of the wall above the furniture (sofa, bed, console). Smaller and the wall looks empty. Larger and the gallery overwhelms the room.
Vary the orientation. Mix vertical and horizontal frames in approximately a 60/40 ratio. All vertical reads as nervous; all horizontal reads as flat. The mix creates visual rhythm.
Treat negative space as a design element. The empty space between frames is just as important as the frames themselves. Consistent 2 to 4 inch gaps make the layout feel planned rather than scattered. Leave generous breathing room around the edges of the entire arrangement — do not crowd the corners of the wall.
Common Gallery Wall Ideas Mistakes and How to Avoid Them
If your gallery wall feels off but you cannot pinpoint why, one of these five mistakes is almost certainly the culprit. Each one has a simple fix.
Mistake 1: Hung too high. The most common error. Center of the arrangement should be 57 to 60 inches from the floor, not 70 to 80. If your gallery feels like it is floating, lower it by 6 to 12 inches.
Mistake 2: Inconsistent spacing. If gaps between frames vary from 1 inch to 4 inches, the layout looks unintentional. Pick one spacing measurement and use it for every frame in the arrangement.
Mistake 3: No anchor piece. Without one frame that is significantly larger than the others, the eye has nowhere to rest. Promote one frame to anchor status by making it 50 percent larger or moving it to the visual center.
Mistake 4: Mismatched frame finishes. Three black frames, two gold frames, and one white frame look like a yard sale. Repaint the off-color frames or replace them so every frame matches.
Mistake 5: Forgot to step back. Stand 8 to 10 feet away during the planning stage. Most gallery walls are viewed from across the room, not from 12 inches away. Layouts that look perfect up close can look strange from a distance.